Showing posts with label Music Video. Show all posts

Thursday, 1 March 2012

Editing

Once we had all of the footage it was time to edit it. To edit the footage and compose a video, we had to use a programme called Final Cut Express. This was a programme everyone in the group was unfamiliar with as we have never had to undertake a project like this before. I have however managed to have a play with it once before when I was on a work experience placement so the idea was familiar, but I was as unsure as everyone else as to how to produce a video. The following steps that I will write about is how we edited both the rough cut and final cut. The first thing to do in order to begin editing is to upload the footage on to the computer. In order to do this, we just had to load up the Final Cut programme and plug the camera in and upload it, not too difficult. Once the footage was on the computer it was time to look at the layout of Final Cut and begin to experiment with the different sections we were faced with.
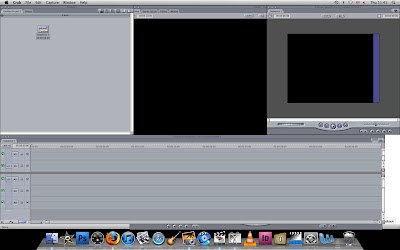
Final Cut Home Screen
Above is what we were faced with when Final Cut was loaded. As I have said, I have seen Final Cut been used before, both from my work experience and also from seeing previous years use it. I understood that the bottom of the screen is the time line where you place the audio and visuals to the video. Other than this, I was not entirely sure of what else to do.
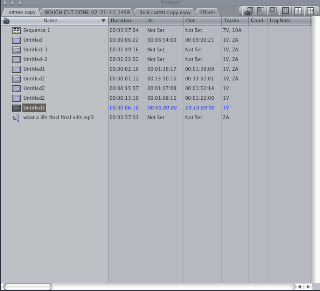
'Browser' - Where Our Footage Went To
So, we uploaded the footage and noticed that it went to the top left hand corner of Final Cut in a screen called 'Browser'. As you can see on the right hand side, I have taken a screen grab of the section of Final Cut that contains all of the footage, audio and other pictures that we wanted to include. As we had a few different pieces of footage from different filming days, it was essential to rename everything so as we knew where to look when we wanted to take a bit of footage, so after it was uploaded and given the name 'untitled' I went through and re-named them to things that the rest of the group would know so as they could find footage if they were editing. The easiest thing to do was to add the audio in to the editing suite. To do this, we just had to open the file and drag it to the bottom of the time line. Below is what it looked like when the audio was dragged into place.

Audio Time Line
The next thing to do was to get the story board and start trying to refer to that when editing. The story board showed that the first shot was a locational shot of a tunnel that we wanted our model to perform in. We also knew that we wanted this footage when we went up to London, as the whole idea of the video was a performance style. So, to start the video, I located the footage with the bits of the tunnel that we had filmed and the parts where we had Glenn in the tunnel performing and began to take it and add it to the time line. This was a fairly straight forward process to do.
Viewer
Mark In/Out Arrows
When we uploaded the footage and re-named it and then found the bit of filming we wanted to edit, it showed up in the middle box of the Final Cut screen. This is called the 'Viewer'. The chosen footage appears here. From speaking with our teacher, we knew that we had to do a process called 'mark in' and 'mark out' and then drag the footage to the time line. So, the 'viewer' showed the uploaded footage that was saved on to the computer and then we played it to locate the parts that we wanted. When we found the piece of footage that we wanted, me had to put a 'mark in' and then a 'mark out' when that section of footage had finished. From work experience I remember that you use the 'I' and 'O' keys on the key boards to do the marking - 'I' to mark in and 'O' to mark out. The mark in and out bar is seen above left with the blue arrows. Once the arrows are there with the footage that I want to be included in my edited piece, I had to simply drag the marked footage from the 'Viewer' box and place it on the time line.
Footage For Time Line
On the left hand side is what the marked in and out footage looks like once you drag it down to the time line. It shows a small image of the start of the shot and the name of where the footage was taken from.
Time Line With Visuals And Audio
So, after taking a few different clips from the viewer and the different footage that we have filmed over the few days we went to London with Glenn, the time line started to look a lot like the one above. You can see how the audio is at the bottom of the tracks (in green) and the visuals are in blue. As well as the blue you will notice that there are grey boxes at the start and end of some of the marked in and out footage. These are transitions that we added in, in order for the video to look authentic and not look like it has been thrown together with just quick cuts. The transitions that we added in to the footage included 'cross dissolves' and a variety of different fades. Adding the different effects in to the footage was quite an easy process that is explained below.
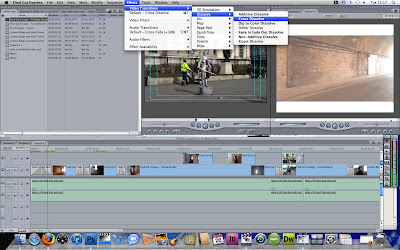
Effects
Transitions
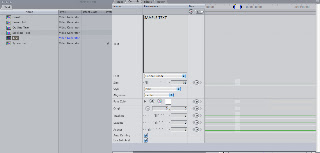
When we wanted to add an effect to a certain piece of footage, we had to select either the start or end of the footage (depending on where the effect is) add click 'Effects' at the top of the page on the Final Cut menu. The screen grab on the top left hand side of the screen shows how I have selected a piece of footage (the first blue box on the top line) at the start of the clip. I have then clicked on 'Effects', 'Video Transitions', 'Dissolve' and 'Cross Dissolve'. This then adds in the appropriate transition depending on what is clicked and from here you can alter the length and duration of the effect. (the picture bottom left is a close up of the steps taken to add the dissolves).
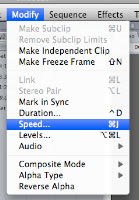
Speed
So, the transitions were easy to add into the footage and the video was coming together nicely. We did notice that some of the shots were too quick and would look better if they were slowed down to fully appreciate the shot and so as it went with the music a bit better. I wasn't sure how to edit the footage to slow it down so I looked at the top menu bar to see if there was anything there. There is a tab called 'Modify' so I assumed this may have something to do with it, and after clicking on it there is another link called 'Speed'. There were a few shots that needed to be 'under cranked' or slowed down and to do this I just clicked on the footage that needed to be under cranked and went to and 'modify''speed' and was faced with the screen on the right hand side.

Making Tracks Bigger
With the video coming together nicely, when I played it through I noticed that there were some black gaps in it that needed to be filled. From looking at the time line as it was, I could no identify where the gaps were, I needed to zoom in. I was unsure how to do this but notice another student in the class had managed to, so I asked how it was done. On the bottom left hand corner of the time line, there is a little scroll bar (the one above). By dragging the dark grey arrow between the two faced in arrows, you can alter the size of the time line to all squashed up and to being on one screen, to all spread out, showing the milliseconds of the video rather than seconds and minutes. After making the time line as spread out as possible and showing the milliseconds of the video, I could then scroll across and find where there were any gaps and properly join the footage together or add an appropriate transition depending on what was needed.

With the video now fully completed from start to finish there were a few things that I noticed when viewing the video all the way through. Firstly, the obvious thing was that in order for our video to follow the conventions of a contemporary music video out in the media today, we had to include a title for the song (as all music channels do when they introduce a song) and also a logo for a certain music channel. As well as this, I noticed that some of the shots were in wide screen and some were not. This proved a problem as some of the footage had black bars at the top and bottom (from the wide screen shot) and some did not. I could not remove the footage that had the black bars at all, so I tried to find a way of adding the bars to the rest of the footage. 


MTV Rocks Logo
Image + Wireframes
So the first thing I did was to sort out the title and logo for the video. This was a very straight forward process to do. As a group we decided that our video would probably most fit on the channel MTV Rocks (left) due to the genre of the music that we are using. Now that we had decided to focus the video around MTV Rocks, it was time to go and find the logo. I did a simple Google search to find the logo and noticed that some of the logos that came up had different coloured backgrounds or in fact, just a white background. A different coloured background would mean that the colour would appear on the video and look unprofessional, so it seemed that we needed the logo that had a transparent background. The best logo we could find with the transparent background was from Wikipedia. I clicked on the Wikipedia logo - found here -, saved it to the desk top, and then went back in to Final Cut. Once Final Cut was back on the screen, I just went to 'File', 'Open' and then opened the image that I had just saved. The image then opened up in the 'Browser' box, where all of the footage we have is located. From here all I had to do was drag the picture from the 'Browser' on to the time line to the start of the video. (Below shows how it looks on the time line) Once the logo was dragged on to the time line in the appropriate place, I had to reduce its size as it blew up the size of the video. In order to do this I had to 'key frame' the image. Key framing is something that is done in editing that can animate things. In order to reduce the size of the logo so that it just sits in the top left hand corner of the screen, I had to make sure key framing was turned on for that particular image. To do this, I had to click on the image and then on the top of the 'Canvas' box there is a box that I clicked and then selected 'Image+Wireframe'. Once this was selected, it was a case of reducing the size of the image and just dragging it to the area of the screen that I wanted it.


Time Line With Logo's And Locked Footage

From the screen shot above, you will notice a few different things that should be explained. Firstly, there are 5 different layers of footage. Why? As well as this you may notice how there is grey hatching over the whole of the footage, again, why?


Locking Logo
Firstly, the reason they grey hatching is there is because I have locked the layers. If you do not lock a certain line and you add some footage above it, then the footage that is added on top forces the footage that is below it to shift out of place thus making the whole of the video out of sync and ruined. So locking the layers just means that what you have edited stays in the place without moving ever unless it is unlocked. In order to lock the footage next to each line on the time line on the left hand side, there is a symbol of a padlock (right hand side image). All I had to do was click this and the line was locked. Locking also means you cannot edit anything in that selected line unless it is unlocked.

As said above, the other thing that I said above is that there are 5 different layers of footage and images. This is essential in editing. If it was all placed on one line then the above footage would be a straight clip with the screen showing only one visual at a time. With the over lays, the video can show a number of different images at the same time. So in this case, the above time line will show the video, with the logo, a green bar and text all at the same time without switching shots altogether. As well as this, over laying footage means you can have one big piece of footage playing, and change to other shots and then return back to the other piece of footage (the long bit playing) without having to go back and mark in and out and drag it back to the time line. We knew that we needed at the very least two layers, as one whole line is taken up by the MTV logo -it has to spread across the whole time line for it to appear in the whole video. 


Green Title Bar
After the MTV logo was added and positioned in the correct place on the screen, it was time to add the title bar and title of the song so as to introduce it. As a group we decided that the best colour for the title bar to be was green, so that it matched the colour of the logo and their website. In order to do this, I went on to the MTV Rocks website and took a screen grab of part of the green in a rectangular shape (the same size and shape roughly of the title bar itself). The screen grab of the green bar that I took is above. To then add this into the video, it was exactly the same process as adding the MTV logo - so save the screen grab, go to file, open, click the document, drag it to the time line on a separate layer, and then finally position it in the correct position. The final thing to do to the video was to add text that identifies the song and artist.
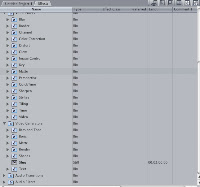
Effects - Text
Writing Text
This again was another simple process that was straight forward from just looking at the Final Cut programme. In the 'Browser' box, there is a tab called 'Effects'. I clicked on this which brought up a whole selection of effects. At the bottom of the list there was a selection called  'Video Generators'. In this folder there is a link called 'Text'. Once this is clicked on, another box opens up with different text effects, but because I just wanted a simple text addition, I clicked on 'Text' again. From here, in the 'Viewer' box, a box comes up where you can enter any text you wish, so I typed in 'What A Life - Noel Gallagher'. This then added the text so I had to drag this from the viewer ox down on to the time line, just above where I had placed the green bar. It was also important to start the text a little after the green bar starts. If you look at music videos, you will see that the title bar pops up first, and then the text shows. The FINAL thing to do with the video was just to add a transition to the bar and text. We did not just want the bar to pop up on the screen without warning and then just pop off again, so we thought it was appropriate from seeing other music videos to have it fade on to the screen, and fade off. To do this, I did exactly the same process as I did when adding fades and cross dissolves to other pieces of footage (explained above).


Time Line With Logo's And Locked Footage

This picture is above, however it is exactly what my time line looks like with the added green bar, text and appropriate fades.

Tuesday, 21 February 2012

Day 4 Filming - Glenn

Half term was upon us and so we thought it would be best to try and get as much filming done as possible so as we had enough footage for when we came back to school. So, I messaged Glenn and asked when he was free hoping he would be able to help us out again. But it was unfortunate that due to it being half term, Glenn was down to work most days and was not available on the days the rest of the group were free. Frustrating yes, but it is something that cannot be helped when the model is not physically free! So, we agreed over the holidays that the best day to go and film so that we had enough footage for when we returned to school was 20th February, where we were all free to travel up to London and film.

Myself, Jay, and Adam went up early in the morning to try and do bits that we did not require Glenn for, such as more location shots and shots of crowded areas with people going about their every day life.
Trafalgar Square
Jay With Street Artist
One of the first locations we went to was Trafalgar Square. This is a well known area in London which is constantly busy with tourists, commuters and street entertainers. At this location, we simply took a few pan shots of the area that showed the busy life around the square. As well as this, we noticed some street artists that we thought we could take advantage of. Whilst filming, Jay walked up to the artist and placed money in front of him and we filmed the reaction (see above. The shot also made it into the final cut). We thought it was good to incorporate a number of street artists that we found on our travels as they show how different people have their own ways of earning money and it is interesting to see who and how many people approach them.

Westminster Bridge
Bagpipes Man
As well as Trafalgar Square, we did some pan shots off of Westiminster Bridge. The views off of this bridge show the likes of The Houses Of Parliament, The London Eye, and shots up and down the river. As well as locational shots, becuase the bridge is so busy, we utilised this and held the camera whilst walking across the bridge and had some decent shots of the public walking towards us. When walking across, we also came across another street artist/busker. The man can be found on the right hand side of the page and you can see that it made it in to our final cut. Again, we thought it would have been an effective shot just to walk past and have the camera look at him just as a normal member of the public woud walk by and look at what he is doing.

Southbank Busy
Me Filming
At the end of the bridge, we turned right on to Southbank to walk past the London Eye and try and see as many street artists as we could. At the top of the steps down to the bank, I stopped and put the camera on a wall and recorded the 'life' below. The area is constantly busy due to there being a McDonalds, arcade, aquarium, London Eye and a 'scary experience'. The picture on the left is the where I placed the camera (a little bit further forward so that the wall was not in shot). With a selection of zooms and mild pans we had a good variety of shots that could potentially be used in the video (the shot was used in the final cut and is also a contending shot that could be used for one of our ancillary tasks) After we had gotten the shots that we wanted without Glenn, it was time to go and meet him. By the time he got to us, it was about 1500, and Jay had to go to work, so he left us for the day and Adam and I carried on. On the right hand side is a picture of me filming at one of the location shots.

Rough Cut Dark Shot
Final Cut Lighter Shot
So, we met Glenn at London Bridge station, about 5 minutes after Jay left and proceeded to the tunnel that the group filmed in that made it in to the rough cut. We knew that we had to film every shot we had from the rough cut again as they were way too dark. We spent only half an hour or so here filming Glenn a number of times performing the song from different camera angles. The picture on the left was used in the rough cut and I even played with the colour becuase the darkness was so bad. The picture on the right hand side was shot for the final cut in the light. You can clearly see the difference in the shots. It shows how the time of day can influence the video, too dark can make it look dreary whereas being too light and bright may mean that you cannot see the shot properly.

Outside Mayor's Office
After we had finished in this location we decided to walk on to Southbank with Glenn and do some more performing/busking shots. This was something that our audience feedback asked us to do, more performing locations. From the last time that we went up to London, I knew that a good spot to do this would be outside the Mayor's office. Here is constantly busy with commuters and tourists, as well as having Tower Bridge in the background on one side, and London Bridge on the other. Here we managed to get a good few performances of Glenn with the public walking by looking which is an effect we wanted to create.

Monday, 30 January 2012

Day 3 Filming - Glenn

On the afternoon of 25th January, Jay, Adam and Glenn went up to London to do some more filming. I was unavailable due to work committments, however the others went up anyway as we needed some footage! Again, there was a race against time with the light, but the footage that they got was of a good standard and we managed to use it to put into the rough cut. Below is some of the shots that the group managed to get that appeared in the final cut.

 The shot on the left is one that we originally wanted from our story board ideas. It is our model holding a sign reading 'What'. There are other shots that with him holding signs that say 'A', 'Life' and '?'. They are not all shots of him in front of the telephone box. When they went up, Adam and Jay just asked Glenn, in different places that they came across, to stand holding each sign for a few seconds. The idea is then to almalgamate all of the sing holding shots together and have a montage of them shown on the screen.


Dark and Overcast
The shot on the right is a pan shot of London from Waterloo Bridge. The shot over looks the train line leading into Charring X station. Jay and Adam thought that it would be effective to have a few pan shots of the city, which I also agreed with, and when walking over Waterloo Bridge, noticed the view so decided to take a shot of it. The only poblem wth the shot is that it is a bit dark with heavy cloud cover which may ruin the continuity of the video fro going to broad daylight to overcast and darkness.

Bright Lights on Traffic
Another shot that was taken on the day was of moving vehicles. As it was dark, the vehicles had their lights on. Glenn put forward the idea to Adam and Jay that filming the traffic and speeding it up in the actual video would look effective with the bright lights. In order for us to speed the footage up, we had to film for a substantial amount of time in a neutral position. Shooting for a short peridod of time, say 10 seconds, would only be about 2-3 seconds on the screen. So they filmed for 2 minutes to get a decent amout of footage with differet vehicles, people and volume of traffic.

Some of the best footage that Adam and Jay got was the shots in the tunnel. When they were up in London, no one could remember where the original tunnel was and I was unavailable to be contacted, but luckily, the lads came across another tunnel. The location is instantly recognizable to anyone who loves and listens to Coldplay.
This is the tunnel that Chris Martin and his band filmed the beginning of their video to 'Fix You'. A link to their full video can be found here. The tunnel is exactly what we wanted with the high brick walls


Friday, 27 January 2012

Boards

When we got back after our first day of filming, we re looked at our story board and noticed that some of the scenes we required our model to be holding signs that say 'WHAT', 'A', 'LIFE' and '?'. Adam took note of this and the next day he came into school with this all prepared. I was only expecting to see a bit of card with the words, but instead, he had managed to find a couple of pieces of wood of equal size and sprayed the letters on the board. Below is what Adam managed to create and these will be used in our filming for Glenn to hold.


Wednesday, 25 January 2012

Day 2 Filming - Glenn

On 19th January, the group went up to London for the first time with Glenn. Glenn informed us that he had been trying to learn the lyrics as best as he could the previous evening and said he knew them well enough to sing along to. There was a slight problem that we had to deal with when up in London, and that was time Due to other commitments in the morning, Glenn was only available from 1230, meaning that we didn't get to London until 2 which in turn meant we were fighting to use as much daylight as possible seeing as it gets dark very quickly over the winter months.

London Bridge
When got off the train at London Bridge as we were going to go the the tunnel that I had showed Adam the first time we went filming. As we were walking to the location, we were walking over London Bridge (the bridge that goes over the Thames) and Glenn thought it was a nice location to begin filming. This was not an original location that we had thought of, but when we stopped and looked at it, we realised that he was right. We were been able to have get a number of different shots here that included, looking over the river whilst performing the song, walking over the bridge whilst performing and also just general pan shots of London as well as some establishing shots. The picture on the right is one of London Bridge. As you can see, it has quite a large pavement so there was plenty of space to film. Another idea that the storyboard shows, is how our model is to walk across the road towards the camera. Although a very busy road at times, we feel that this could be the ideal location as you have the river as a backdrop, and also, the road as a central reservation so Glenn could easily make it to the middle without having to dodge traffic!

Jay Filming On London Bridge
So, when we were at location, we decided quickly that we would all take it in turns to operate the camera so as 1) we were all seen to be doing something and not just standing around, and 2) to see who the best camera person was. 
People adapt differently to different things and it may have been that Jay or Adam was better at using the camera, utilising the variety of shots better than I would be able to. The picture on the left shows Jay using the camera with the tripod at the London Bridge location. The idea was to film glen leaning on the bridge wall and we would have the camera moving around his body (so start filming on one side of his face, and end on the other side). Although this possible would have been a good idea and looked effective in the video, it proved difficult to keep the camera steady and the final product was a shaky picture. It would have been better if we had a dolly with us which would have held the camera for us and moved it without the wobbly effect.

Glenn Performing On Southbank
The next location that we filmed at on this day  was on Southbank, just outside the Mayor's office. I thought of this location when we were on the train as I had recently seen it in another iconic music video. The video is one by JLS and how they used this location can be found in this link. We thought it would be a good idea at this point to have Glenn in the position that he is in in the picture, whilst singing the song. The backdrop is effective with the iconic Tower Bridge and we also liked the ground with the laminate like flooring.

After we had done some filming in this location, we thought that because the Tower Bridge was so close to us, why not take advantage of it and do some filming there too.

Adam Filming Glenn Along Tower Bridge
The picture above shows Adam filming Glenn performing the song whilst walking along the bridge. Apart from getting a few funny looks and people getting in the way of the camera because they thought they were on TV, the only problem was trying to set the right speed that both Adam and Glenn could stick too. It was hardest for Adam who had to try and walk backwards whilst trying to keep the camera steady. To do this and ensure that the pathway was clear for him, Jay and I walked ahead of him a few feet. The end result looked good with only minor wobbles that cannot be helped.

Me Filming Glenn In Tunnel
By this time, it was well into 1500, and we were all hungry so decided to get somthing to eat. By the time we found somewhere to get some food, get the food and eat it, it was dark. We still wanted to do so many more different location shots with Glenn, but it just wasn't possible with the light that was available to us.

All we could do with the light available was to go to the tunnel that was going to be the focus of the video and begin filming. The light did not really affect us here as it was lit with bright overhead lights. As you can see from the picture on the left, I am using the camera filming glen against the wall, singing whilst playing the guitar. Someof the shots came out really well, but otheres not so well. When we brought the footage back to the class, we realised that the location looked a bit dull and dreary.

Thursday, 19 January 2012

Day 1 Filming

On Sunday 15th January, me and Adam went up to London to begin filming. Jay and our model Jack had football in the morning and were going to follow us up after their match to help us begin filming properly. What Adam and I intended to do before the other two joined us was to film te London Eye. From previous posts I have explained how we intended to have a shot of the London Eye spinning round quite fast. The only way we could have this effect is to film one full rotation of the wheel and then speed it up. This would have taken us half an hour to forty five minutes which is why we went up early so as not to waste time doing it when the other two joined us.

London Eye
When me and Adam reached the London Eye, we noticed it wasn't moving and was in fact shut for 'essential maintenance', the only time it is ever shut in the year. Because of this our filming schedule was ruined for the morning and we had to decide on another day to begin filming. We went and discussed what we could do in regards to filming before Jay and Jack came to meet us and decided on going to our main location of Leake Street and begin filming the opening and closing shots, as well as the still shots of the images on the wall.

Leake Street
When we got to Leake Street we noticed how the street was filled with cars, something we thought was unusual for a Sunday morning. When we entered the street we also noticed a large group of youths in the centre of the street in a huddle. There was also a strong smell of cannabis blowing through the tunnel/street and based on these observations we did not feel it was appropriate to be filming here. It may be OK to film on some days when the street is virtually empty however should we need to re film anything from this street (which is more than likely) then we cannot guarantee that it would be appropriate to be filming here. So, another hurdle that we had crossed and needed to overcome. I mentioned to Adam that on a visit up to London recently with my family I had walked through an underpass/tunnel along the Southbank river which was an even better location to film than Leake Street, so we decided to go and check this location out. The pictures on the left and right are of the new location and you can see that this is identical to our original thought of having our model perform in front of a brick wall, appearing to busk.

OUR DAY GOT WORSE!

Jack
En-route to the new location of filming, we got a phone call from Jay telling us that we needed to find a new model. Jack had text him telling him that he had too much of a workload to cope with and also had no money even though we offered to pay for him... It was obviously an excuse to just not help us out, but either way, our group was stuffed without someone to film. Me and Adam frantically started to think of someone that could appear in our video that would fit the part. It even got to the stage that we started considering someone within the actualy group to film! But then I thought of someone. At the start of the course our teacher mentioned to us that a student from last year, Glenn Rice was in a band and that we should film then, but we decided not to becuase we were not keen on his bands style of music - maybe we should have agreed to doing this and not had all of the hassle of finding locations etc and made it more simple for ourselves by filming a performance video. So I messaged Glenn asking him whether he could help us out, and near enough straight away got a message back agreeing to help us out!! Above, right, is a picture of Glenn. This is not one we have taken ourselves, but it shows Glenns style. It also shows that he is musical becuase of the guitar, which is handy because we need a guitarto appear in our video.

Friday, 6 January 2012

What Music Channel?

As a group we have decided on a song and a rough idea of what our video is going to look like, however it has occurred to me that we also need to think of a music channel to 'host' as it were, our final video on. It is important to add a channel identity in to the music video to add the authenticity to it and to make the video seem more believable to the target audience. Thinking about some music channels, I think it is safe to say that the song that we have chosen is one that could potentially be played on any channel. The song has only just been released in to the charts so it is quite a contemporary song that would be played across a wide variety of music channels. Of course, the music channels would have to be genre specific. for example, you would not necessarily see a Noel Gallagher song being played on something like music channel 'Kiss' as this channel predominately facilitates for more R&B up beat contemporary songs.

We knew that the most obvious music channel that everyone could relate to was MTV. MTV is such a big brand and has many different extensions that show different programmes and different genres of music.

Wednesday, 16 November 2011

Who Are We Going To Use...?

When we started to story board our ideas to the music video, we realised that we didn't have a model to appear in the video. This again is another aspect of the research that we should have considered at the start of the video. It would be no good doing all the research to find that we didn't actually have an appropriate person to appear in our video. We contemplated over who we could use and different people we named but quickly decided against because they were not the sort of person to fit our genre of music.

Jay then said how he knew of someone within his football team that could possibly appear in our video. The person Jay mentioned is a young, enthusiastic singer and guitarist and this is the sort of person that we are looking for. After a few searches on YouTube and watching a couple of his performances, Jay contacted him to which he agreed to help us out. Jack can be seen in the picture to the right.


A performance of his can be found as an mp3 below.


Creating the mp3 bar above was a lengthy process which is explained in this post.

Tuesday, 1 November 2011

Noel Gallagher To Bring Out Music Video!

When the song was originally decided upon, there was no proper music video released for the song. All that was on the internet were videos that contained lyrics and some live performances of Noel Gallagher performing the song, as you can see from the video bar on the side of the screen.
This has now changed. When searching on the internet, Adam, who is in my group, came across an article on the
Sun Newspaper's website reporting of a video that was to be released to Gallagher's 'What A Life' song. The article can be found here. Now that a video has been released, it will probably be played more over the music channels meaning it will become more contemporary. Originally we wanted to stay away from the contemporary music, however as a group we feel that we can still produce a video to the song to a good standard.

The video can be found below.


The video is 8 minutes long and has a story line to it. The video picks up from another song by Gallagher called 'The Death of You and Me'. The video followed a waitress in her life, and his What A Life song takes on from this. This psychedelic video features actor and comedian Russell Brand as he portrays an evil being whom tries to poison the waitress from the video 'The Death of You and Me'. She acts as the protagonist until Noel Gallagher appears to save her from two females. The video is notable for including snippets of a reworked version of 'The Death of You and Me', causing speculation that it has been taken from Gallagher's second solo album.

(taken from Wikipedia)

Friday, 1 July 2011

Music Videos Today

Over the years, music videos have changed dramatically. As stated before, music videos used to be for promotional purposes in order to convey the particular song to a wider audience. As technology has improved and more ideas have come about, music videos have also improved. Music videos before hand use to be more performance style videos such as Gerry Rafferty's Baker Street. (shown below)


This is just one music video of thousands that are available for anyone to watch with just a quick search on the internet, however it appears that as time as progressed, the style of music videos has changed. More and more videos are that of a narrative. This means that the video is more of a mini film, usually related to the song title or a particular line within the song. An example of a narrative video is one of the best (from my view and also channel 4's greatest music videos) music video's of all time; Coldplay, The Scientist. It was named the 11th Best Music Video of all time by Channel 4 in 2010.


In this video, lead singer Chris Martin is seen singing the song, however he is moving backwards. The whole video had to be filmed with him and everyone else walking and doing everything normally, and Martin had to lip-sync the song in reverse (which took him a month to learn). The video was then rewound and it appears that Martin is in fact walking backwards but singing the song perfectly. This idea was used as one of the lines in the song is 'I'm going back to the start'. The concept of the rewound video was previously used for Spike Jonze's 1996 music video for The Pharcyde's "Drop"

Music videos today now seem to 'copy' each other as directors take ideas from other productions and use them to create their own. A simple example of this is OK Go's - Here We Go Again shown below.


This same idea was taken and used in a recent television advert for Berocca.

Tuesday, 28 June 2011

MTV History

The most famous music channel is MTV. It was first launched in 1981 on August 1. The channel was created in order to show the music videos that accompany songs. It allowed the audience to have a visual reference to a particular song as well as a lyrical reference.

The first ever video to be shown by MTV was "Video Killed The Radio Star" by The Buggles, as shown below.

Monday, 27 June 2011

Music Channels Today

There are lots of music video channels that are shown worldwide and her are just a few of the well known ones;
Music video channels as we know them today have dramatically changed over the years as more and more different programmes are shown on them. MTV is a prime example of this with programmes such as CRIBS and Jersey Shore. Music channels have changed so much since the initial airing of MTV because audiences interest is lost with showing simply just music videos. As well as this, the company airing the videos would gain more money, viewing numbers and popularity if popular, successful shows are aired. Below is a typical episode of CRIBS found on MTV. (please excuse the German subtitling)


What Is A Music Video?

What Is A Music Video?

A music video is a short film integrating a song and imagery produced for promotional and artistic purposes. Modern music videos are primarily made an are used as a marketing device intended to promote the sale of music recordings. Music channel MTV was the first ever channel of its kind that showed the first ever full length music video on air. Prior to the 80's, these works were described by various terms including promotional film, promotional clip or film clip. Music videos can be shot in two different ways; either through a narrative or by a performance.

  • A narrative video is something that tells a mini story to the song with either a few characters in, or the main singer and another character in. Usually the video of a particular song has something to do with the title of it, however in some cases, key lines are taken from the song and interpreted in a way so as to create a video to that the audience will understand.
  • A performance video is a video where the band or artist is privileged throughout the video focusing on their singing and, if apparent, their use of instruments. A band performance video would involve lots of shots of each member of the band with the lead singer singing in sync with the song as well as the instruments in sync.